Payroll Module
Payroll Management helps you to process salary for employees, set the variable monthly value component, process loan amounts, calculate over time data and record advance payment. It can define additions and deduction section wise for employees and create the final settlement list for each employee.
In this module you can,
Additions and deductions
To enter the additions and deductions for the employee
Go to Payroll ->Additions and deductions
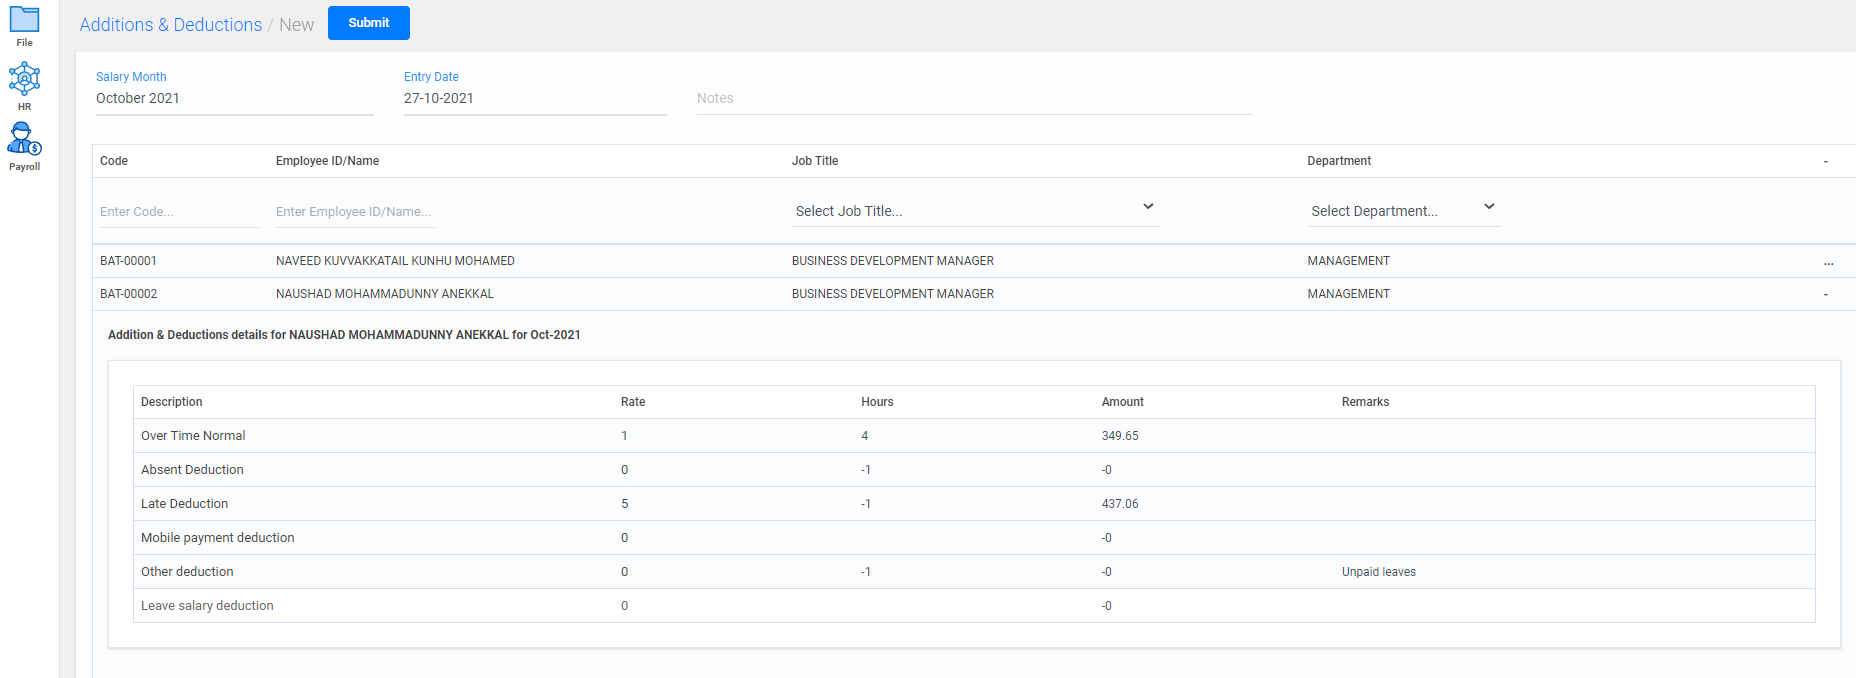
- To add additions and deductions for a employee, click on create new button.
- Current month and date will be displayed for salary month and date.
- Click on the employee details or search for the employee details in the respective fields to add the additions and deductions amount.
- Enter the hours in the applicable description fields.
- The amount will be displayed based on the rate multipliers applied for the particular additions and deductions fields.
- Click on submit button.
- All the details of the additions and deductions are displayed in batch wise; you can either view or edit them if needed
- To view any details of a particular batch, search with its batch number in the search field.
- Watch Video
Salary Processing
To process the salary amount for the employees in the organization
Go to Payroll ->Salary processing
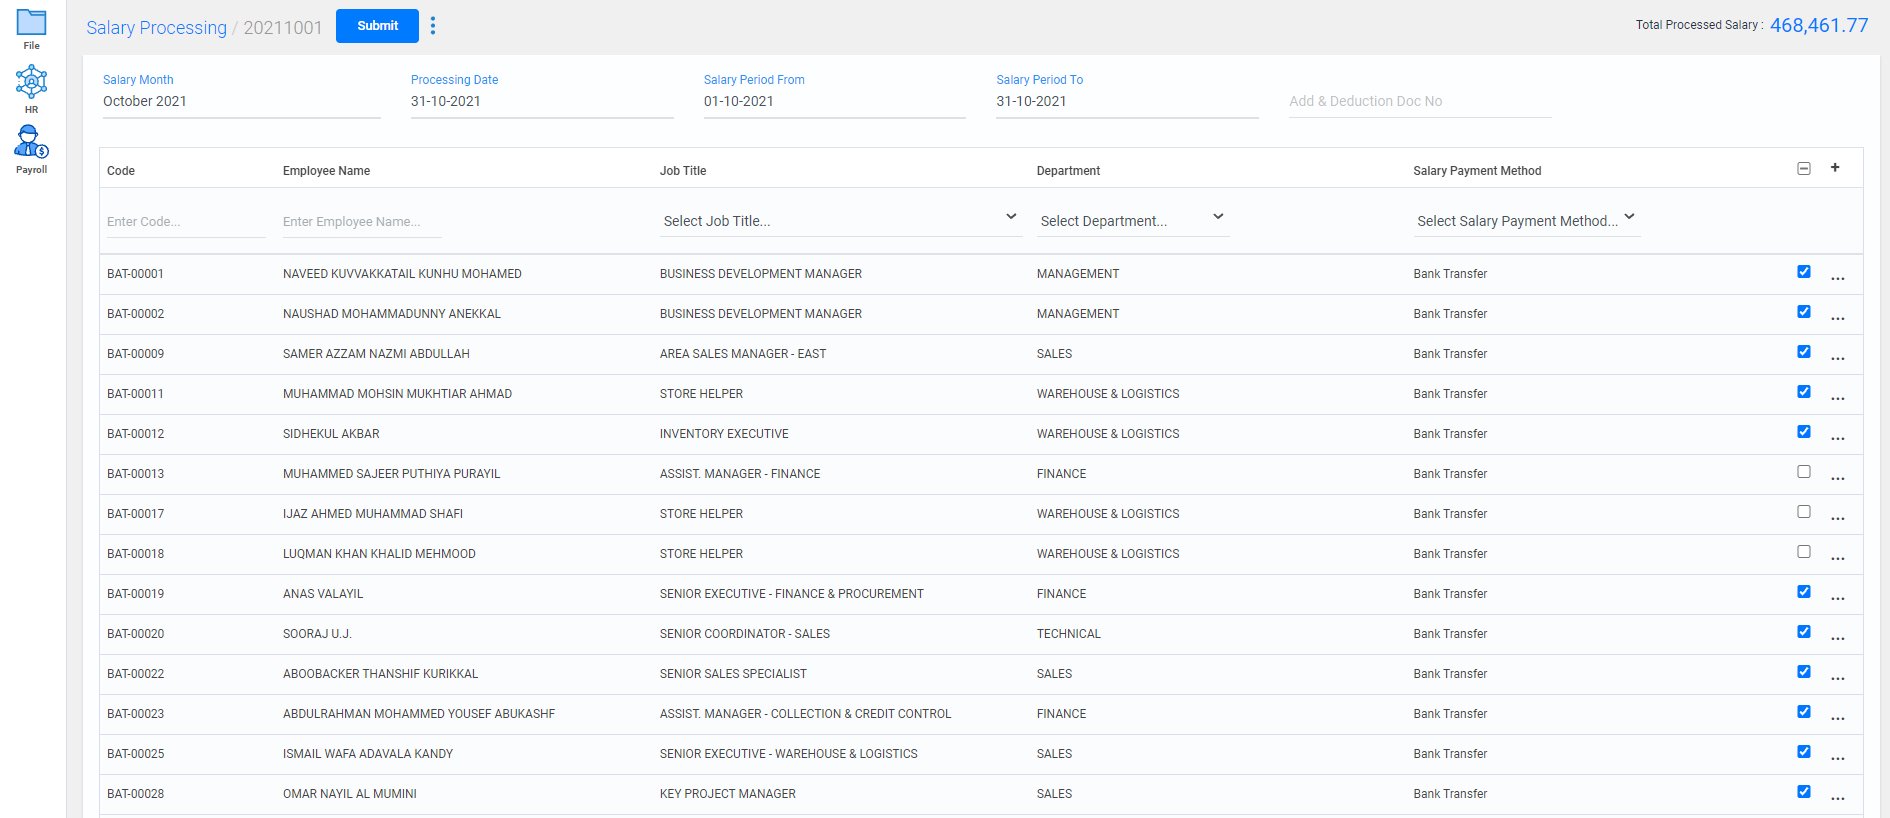
- To process salary amount for a employee, click on Create new button.
- Current month and date will be displayed for salary month and date.
- Current month start date and end date will be displayed for the period from and to fields.
- Click on the Add & Deductions doc no to select if any additions and deductions has been processed for the employee.
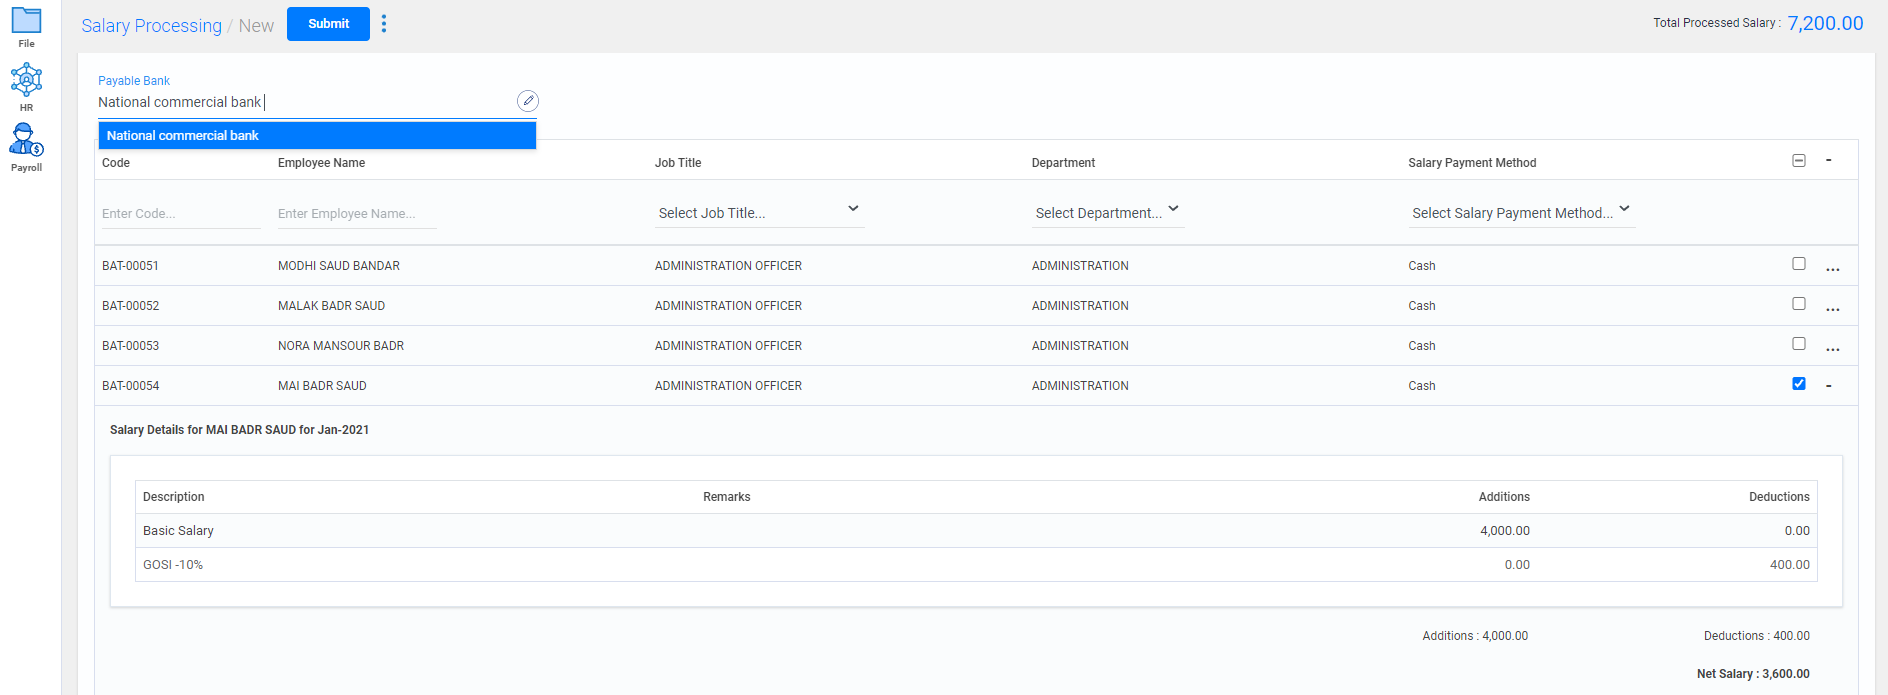
- Select the bank name to process the salary or add a new bank details by clicking on the
 icon.
icon. - All the employees name will be displayed in the list, you can process all their salaries by selecting the checkbox in the right and can view their salary details by clicking on expand button in the right side.
- You can also process the salary for selected employees by clicking on the particular employee row.
- Select the checkbox in the right to process the salary for that particular employee.
- Click on the options icon to view the salary details. Net Salary will be displayed below.
- Click on submit button to process the salaries.
- All the details of the salary processing are displayed in batch wise; you can either view or edit them if needed.
- To view any details of a particular batch, search with its batch number in the search field.
- Watch Video

Salary Payment
To create payment for employees
Go to Payroll -> Salary Payment
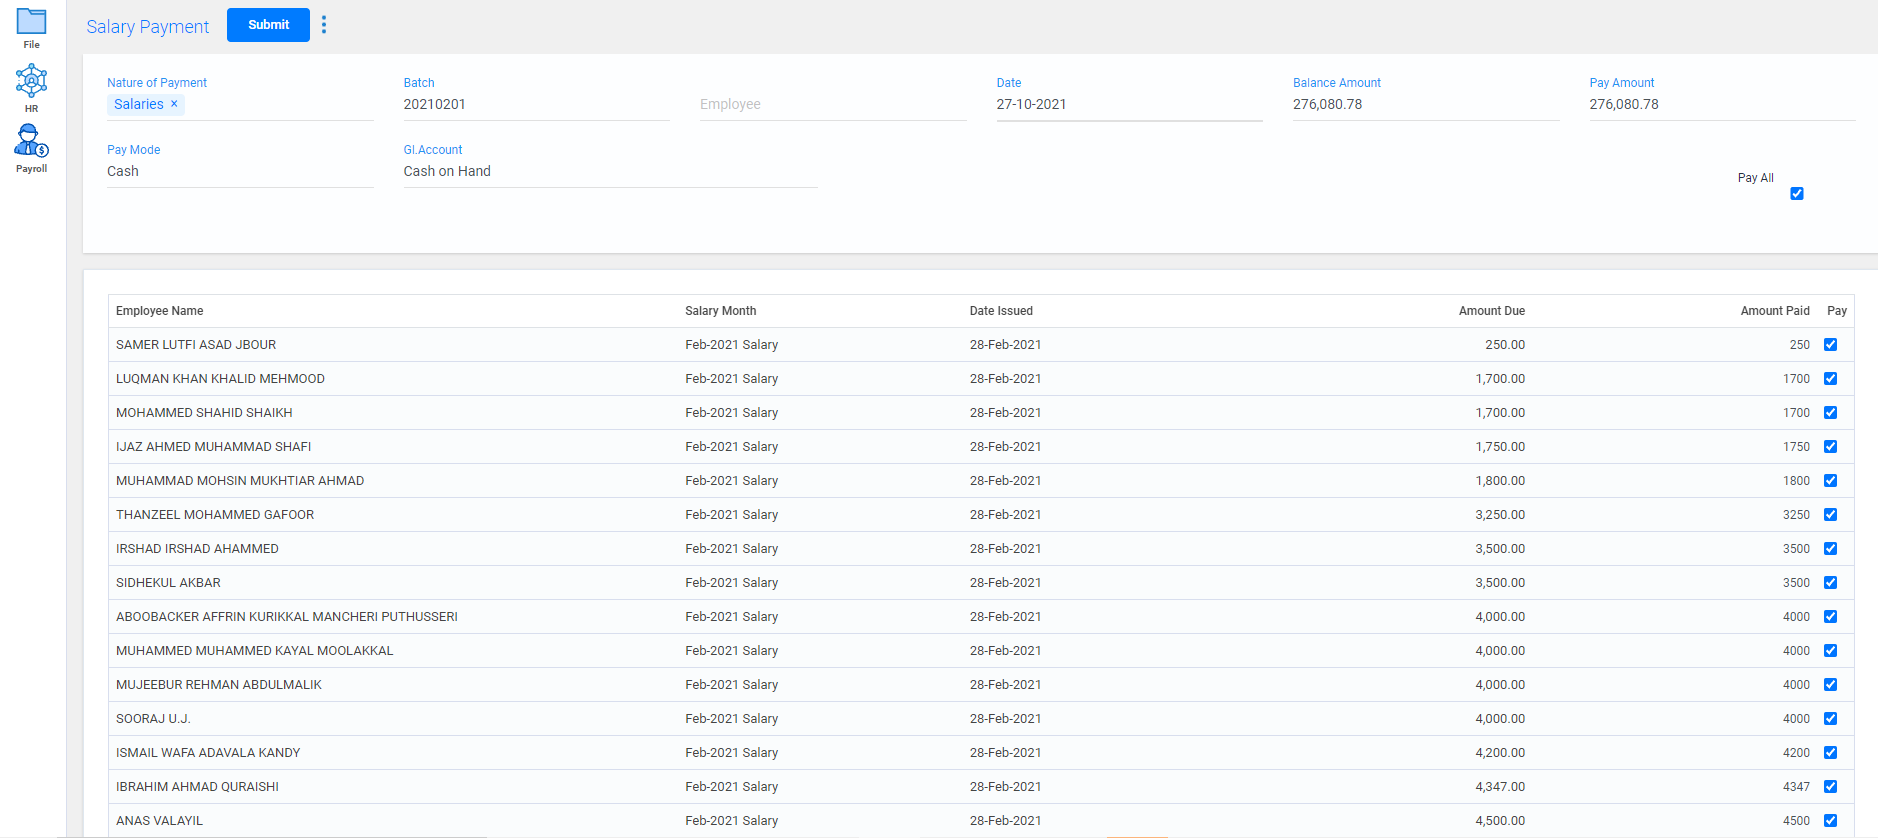
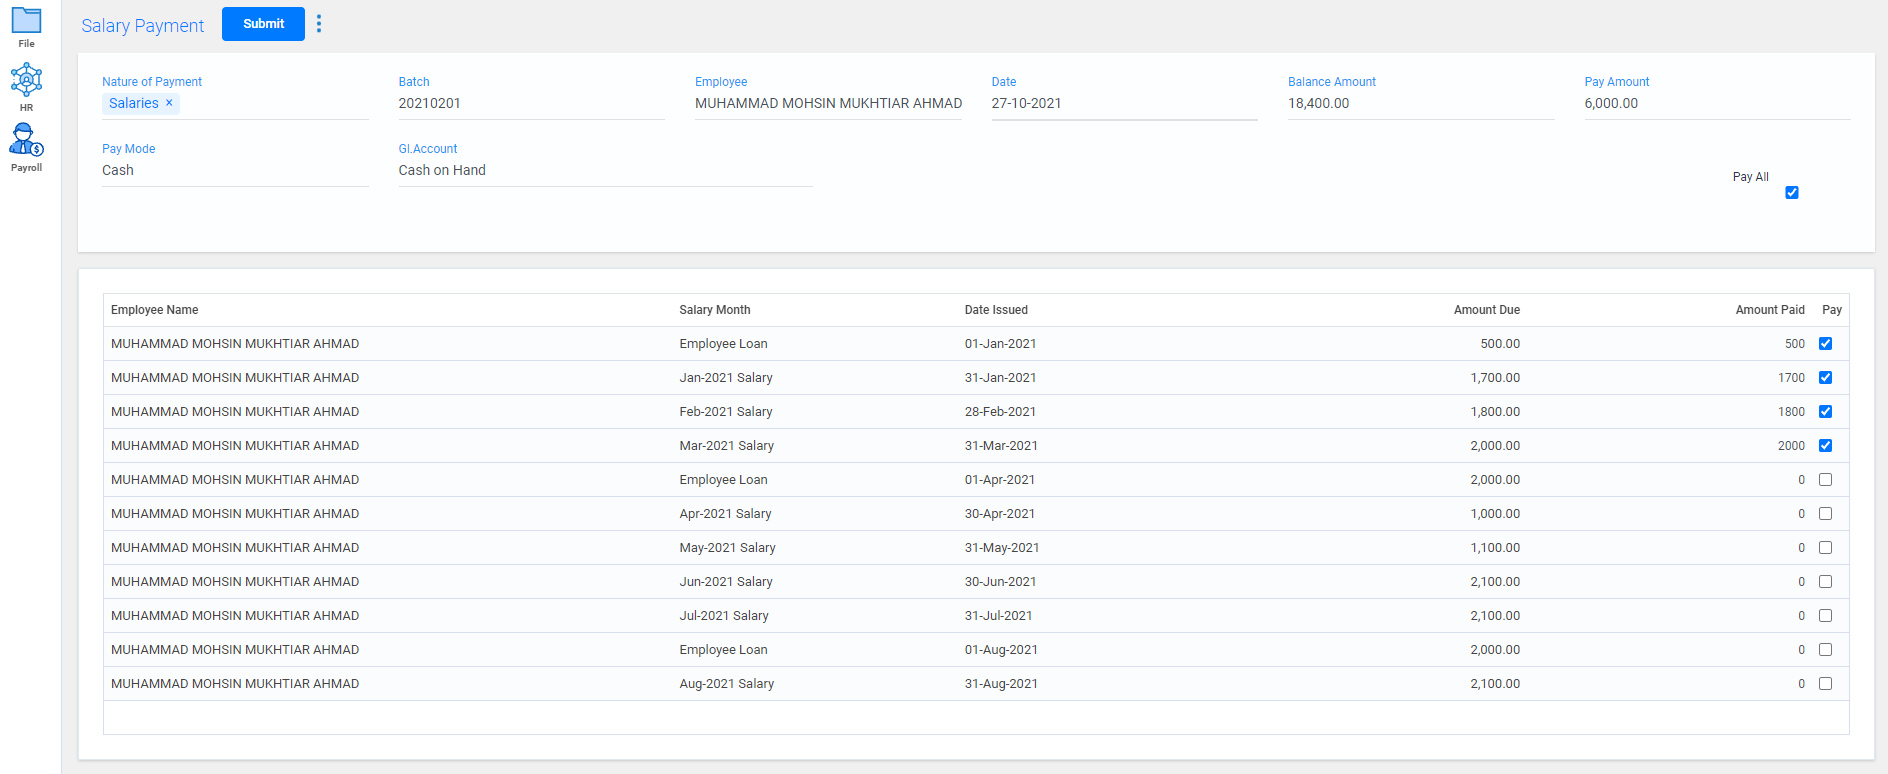
- To pay salary amount for the employees, click on Create new button.
- Select the batch number based on the salary processing document number, which in year-month-date format.
- Current date will be displayed as default in the date field.
- Total amount to be paid for the employees will be displayed in the Balance amount field.
- Select the payment mode and GI account
- Select the pay all checkbox to create payment for all the employees.
- The amount selected to pay now, will be displayed in the Pay amount field.
- You can also process salary or loans for a particular employee by selecting the employee name in the employee field.
- Select the pay checkbox to pay those particular processed loans and salaries.
- Click on submit button.
- Watch Video
Loans and advances
To provide loans and advances to employee,
Go to Payroll -> Loans and Advances
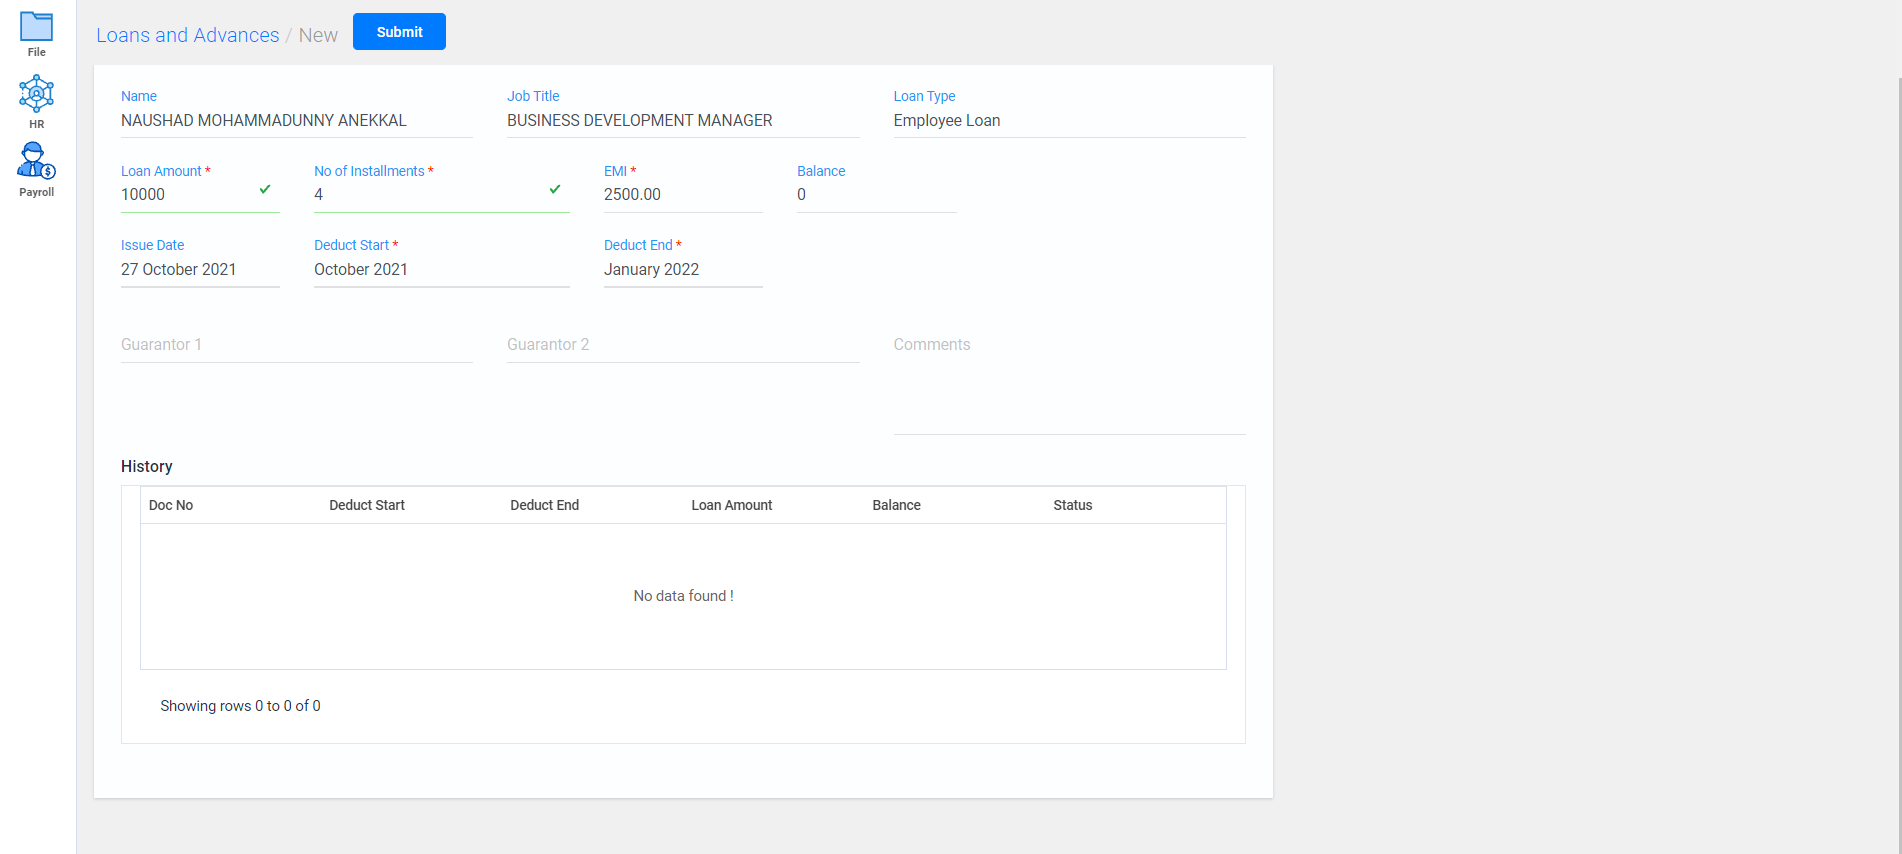
- To create a new loan or advances for an employee, click on Create new button.
- Select the employee name and the loan type(loans or advances) applicable to the employee.
- Enter the loan amount, number of installments to repay, enter the EMI amount.
- Current date and month will be displayed as default, in the issue date and start field.
- Deduct end will be displayed based on the number of installments.
- Mention guarantor names if any
- Previous loans and advances of the employee will be displayed with the status of the loans in the history field .
- Click on submit button.
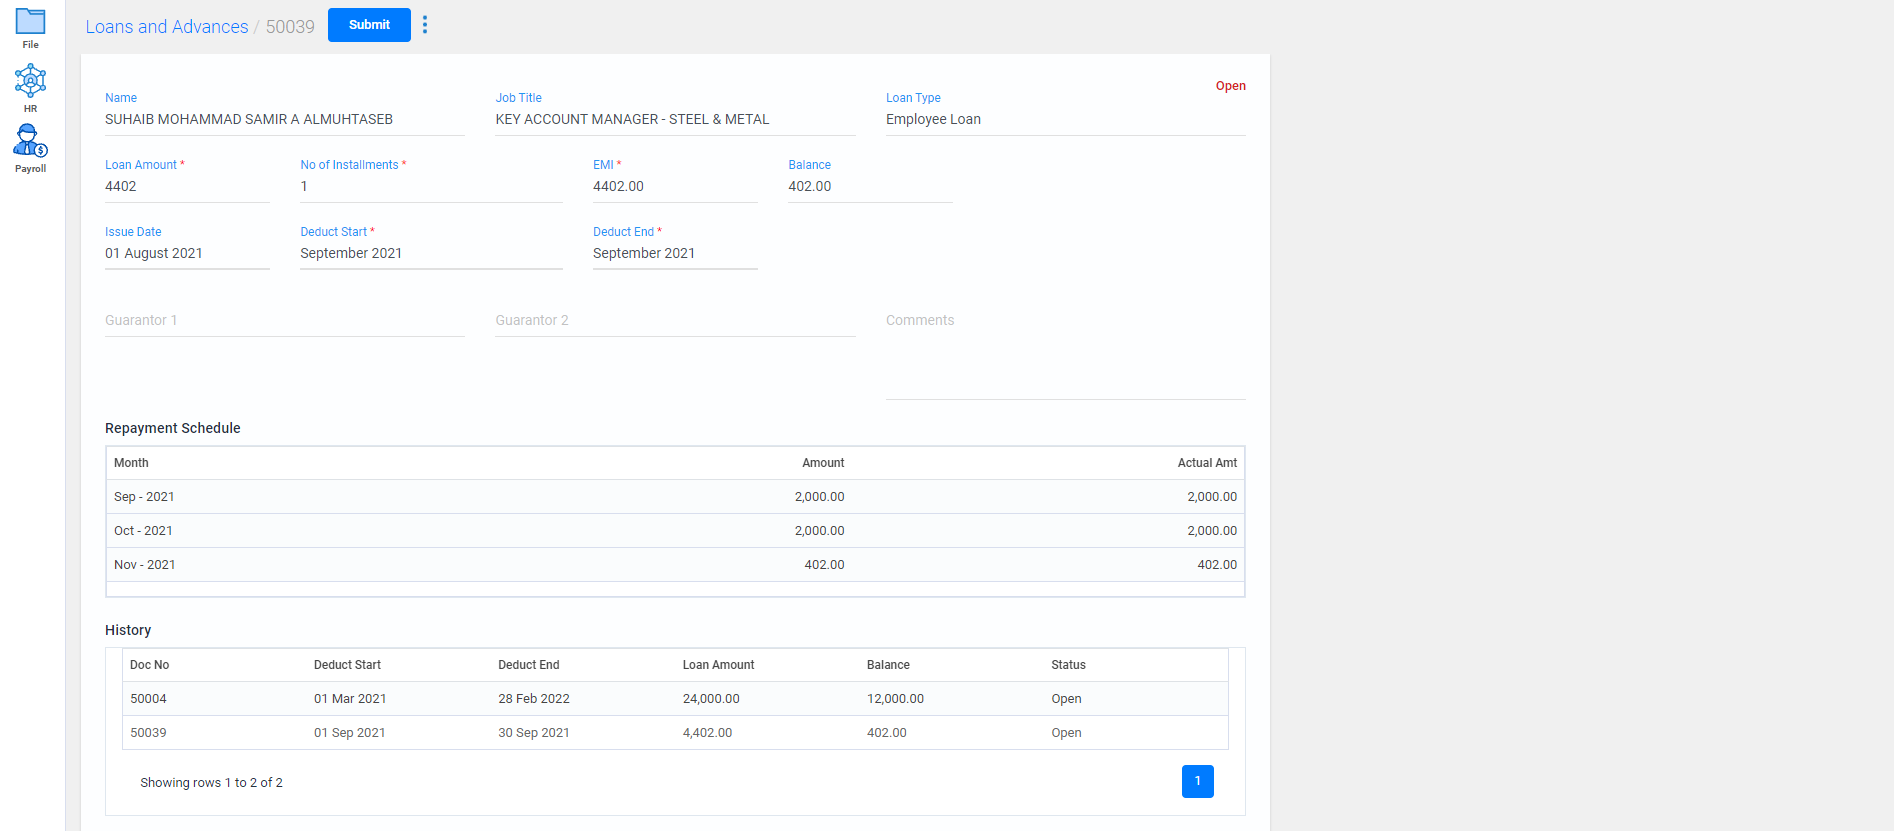
- All the details of the employees loans will displayed; you can either view or edit them if needed
- To view any details of a particular loans/advances, search with the employee name in the search field.
- When you select the document number, the details of the loan/advance will be displayed.
- The status of the loan will be displayed in the right corner. Balance amount and repayment schedule will be displayed.
- Watch Video
Employee Amendments
To enter a payment voucher,
Go to Payroll -> Employee Amendment
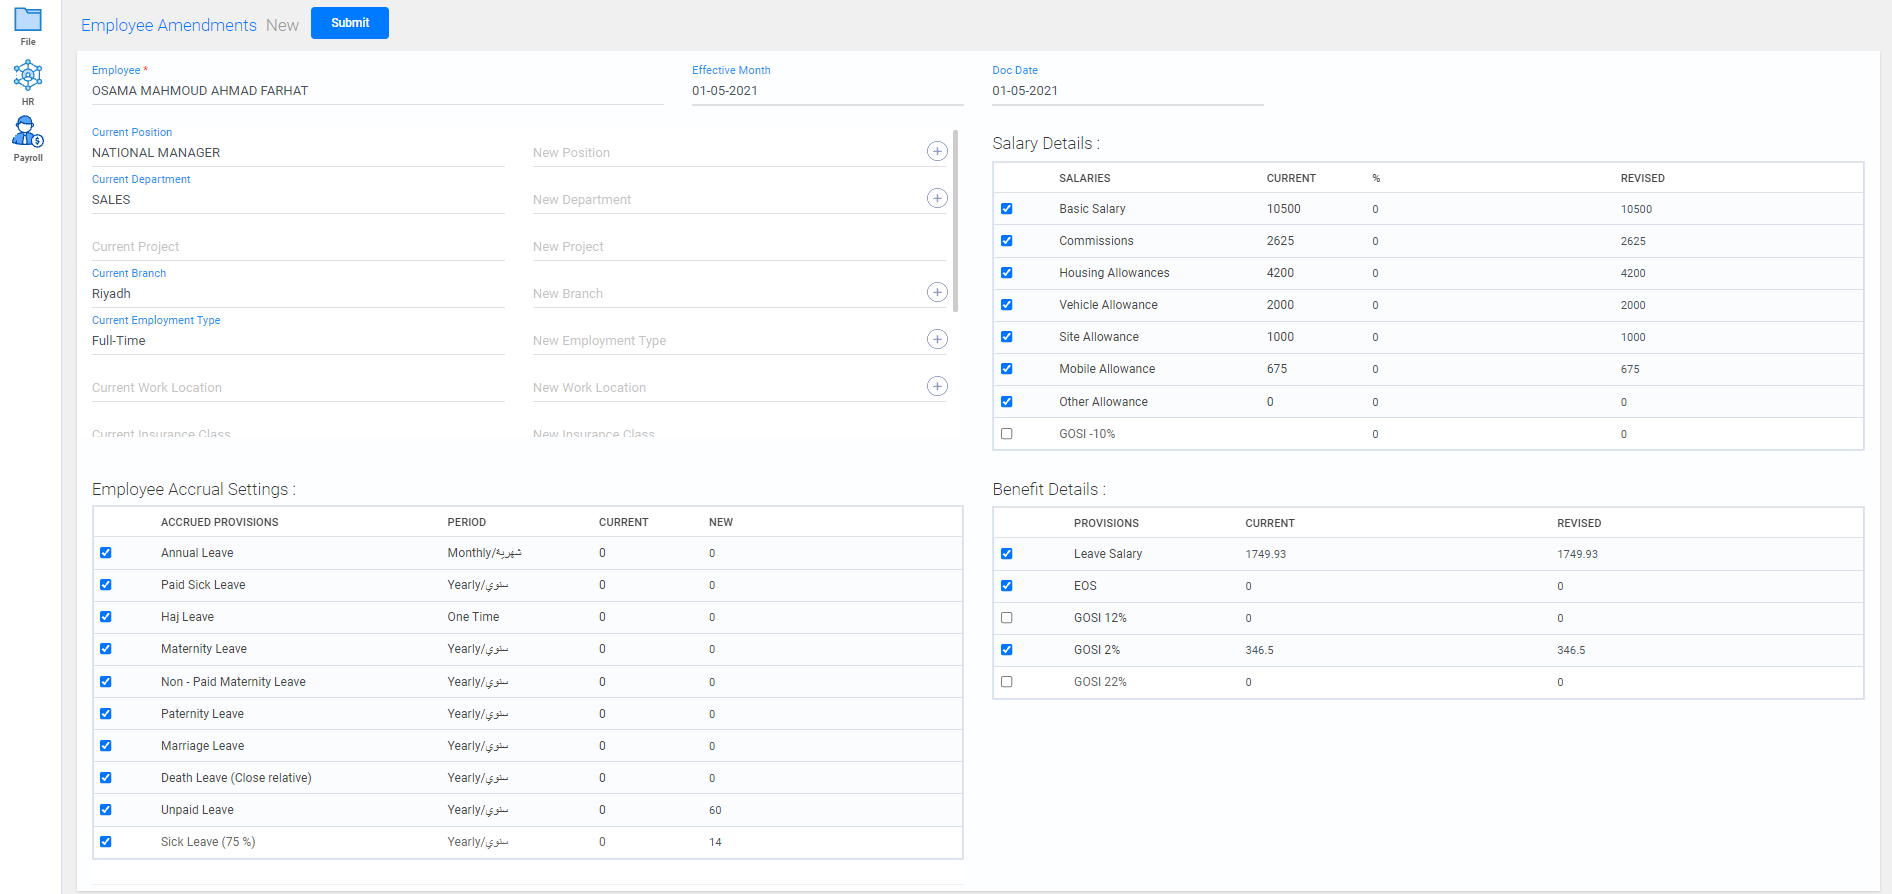
- To add new benefits and provisions for an employee, click on Create new button.
- Select the employee name from the list.
- You can revise the position, department, branch and other details of the employee.
- The current details of the employee will be displayed, you can select the revised field in the new field next to it or add a new entry by clicking on the
 icon.
icon. - Current date and month will be displayed in the effective month and doc date field as default. If it being processed on any further months, enter that specific month.
- Select the checkbox for required paycode from the salary details tab.
- The current rate amount for the paycode will be displayed.
- Enter the percentage to revise the current amount or directly enter the revised amount for that particular paycode.
- Select the checkbox for required accured provisions from the employee accrual settings tab.
- The current number of leave days allocated for the accured provision will be displayed.
- Enter the new number of days to revise the current leave days for the provision.
- Select the checkbox for required benefits from the benefit details tab.
- The current rate amount will be displayed.
- Enter the amount to revise the current amount for that particular paycode.
- Click on submit button.
- All the details of the employee's amendment details are displayed; you can either view or edit them if needed
- To view any details of a particular employee, search with their name in the search field.
Paycodes
To view the paycodes created,
Go to Payroll -> Paycodes
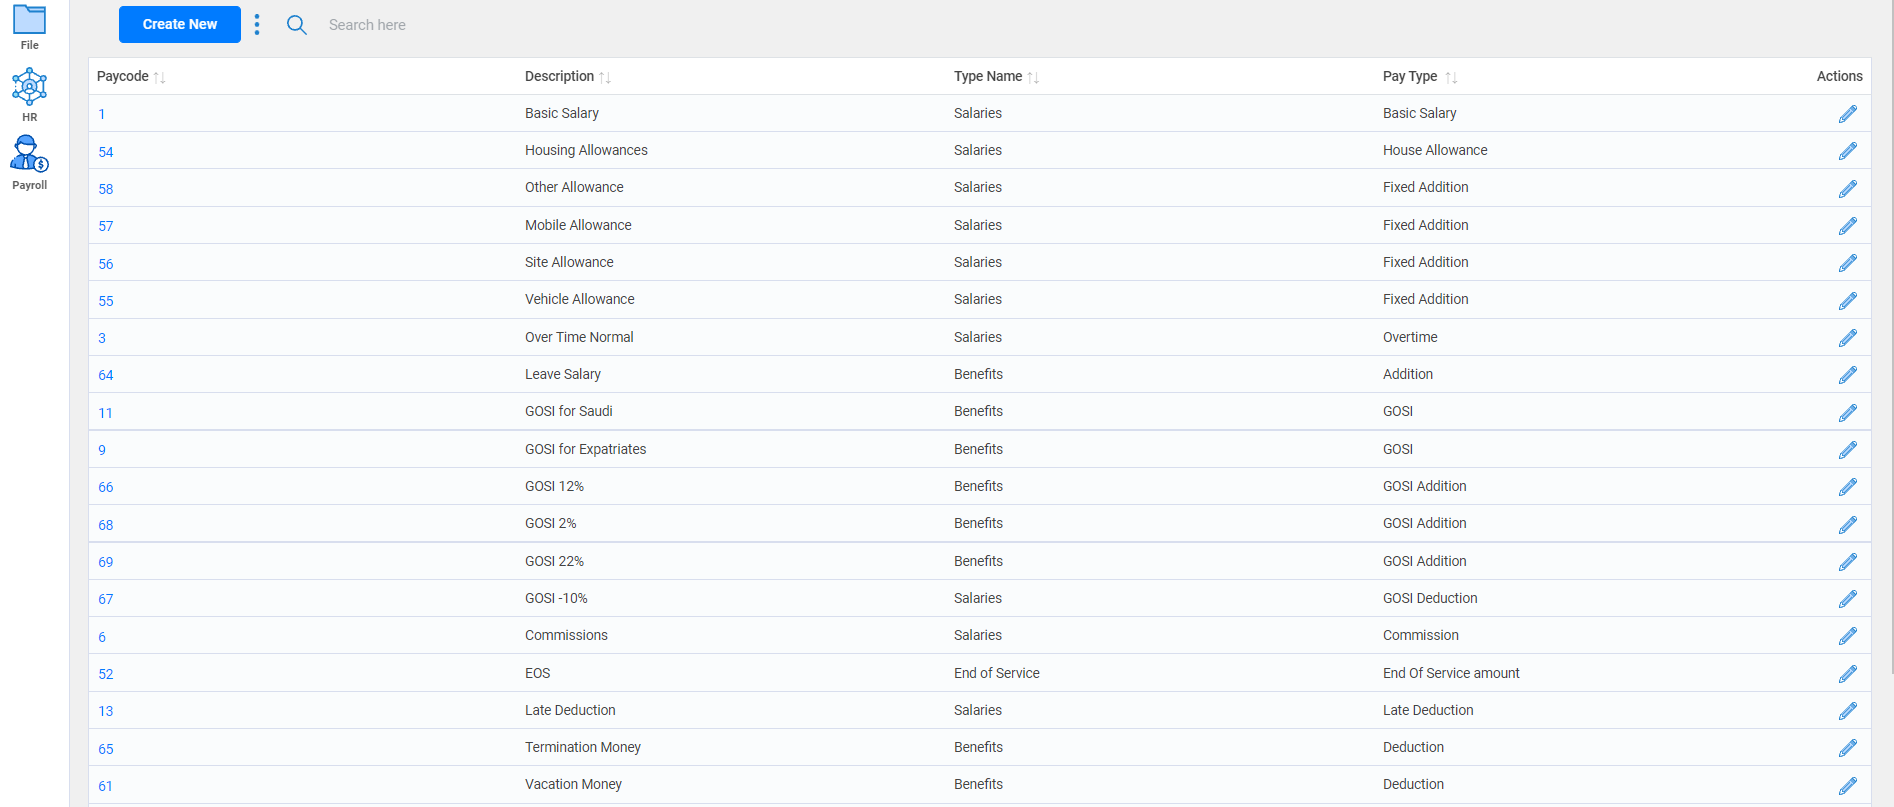
- As default few required paycodes has been created; you can either view them or edit them if needed.
- You can select the Inactive checkbox to disable the particular paycode while viewing the paycode details.
- To view any details of a particular paycode, search with its name in the search field.
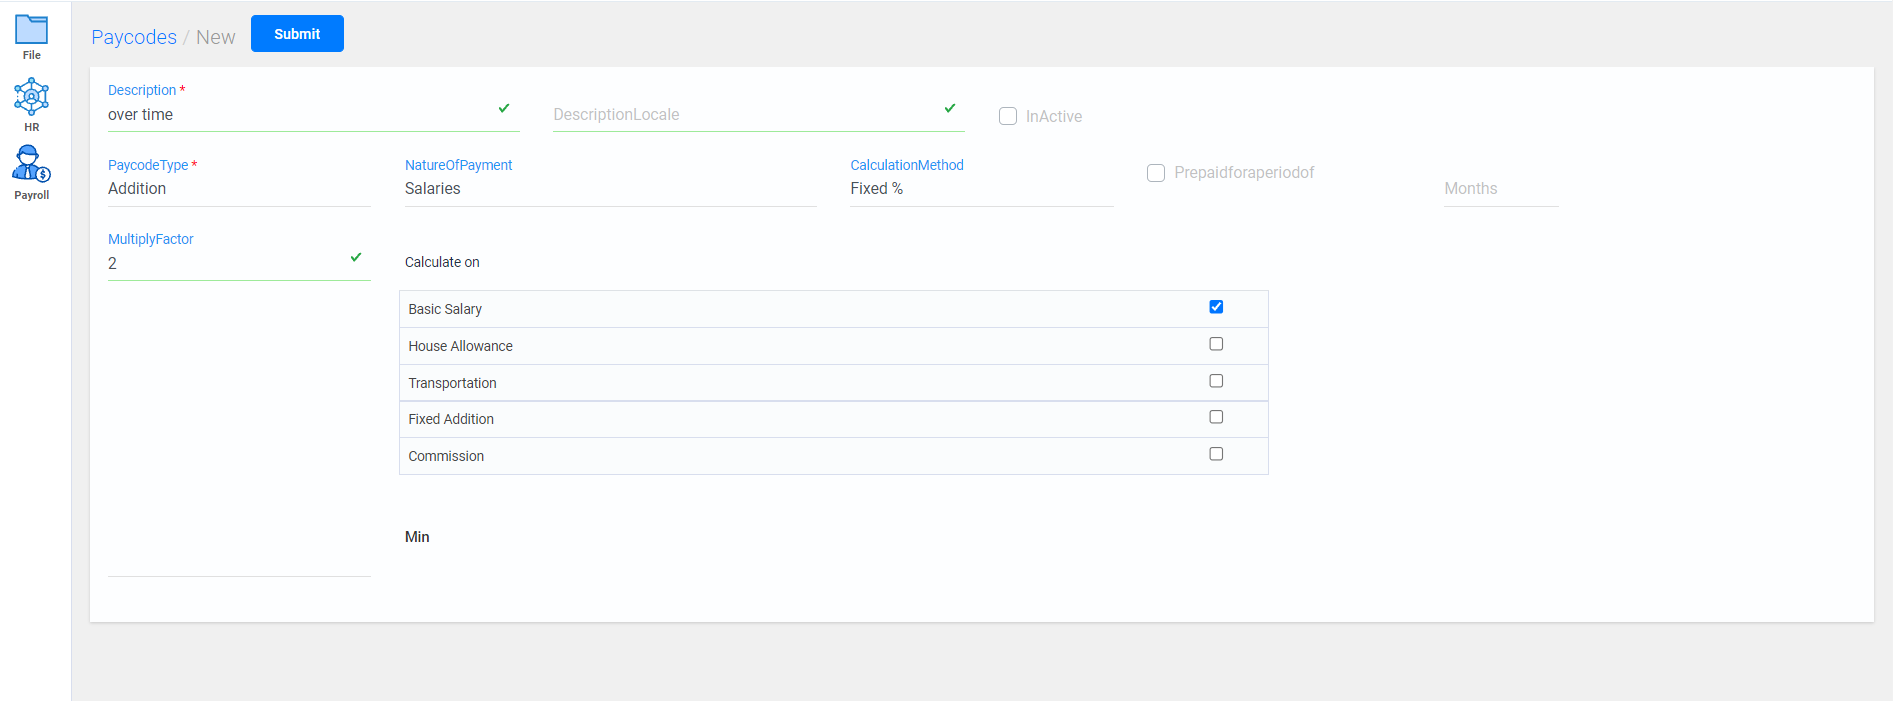
- To create a new paycode , click on create new button.
- Enter the paycode name, select the type of the paycode to perform the relevant calculations.
- Select the Nature of the payment based on the paycode type.
- Choose the relevant calculation method from the list.
- Fixed amount Allows you to enter a fixed amount in the employee information-> salary tab for the specific paycode created.
- Fixed % Allows you to enter a rate multiplier percentage for the paycode which calculates the value based on the selected paycode and displays in the employee information-> salary tab for the specific paycode created
- Variable amount Allows you to enter a particular amount in the additions and deductions screen for the specific paycode created.
- Variable % Allows you to enter a rate multiplier percentage for the paycode which calculates the value based on the selected paycode and displays in the additions and deductions screen with the amount generated while entering the values in the hours column.
- Click on submit button.
- Watch Video
Accrual Code
To create a new accrual code,
Go to Payroll -> Accrual Code
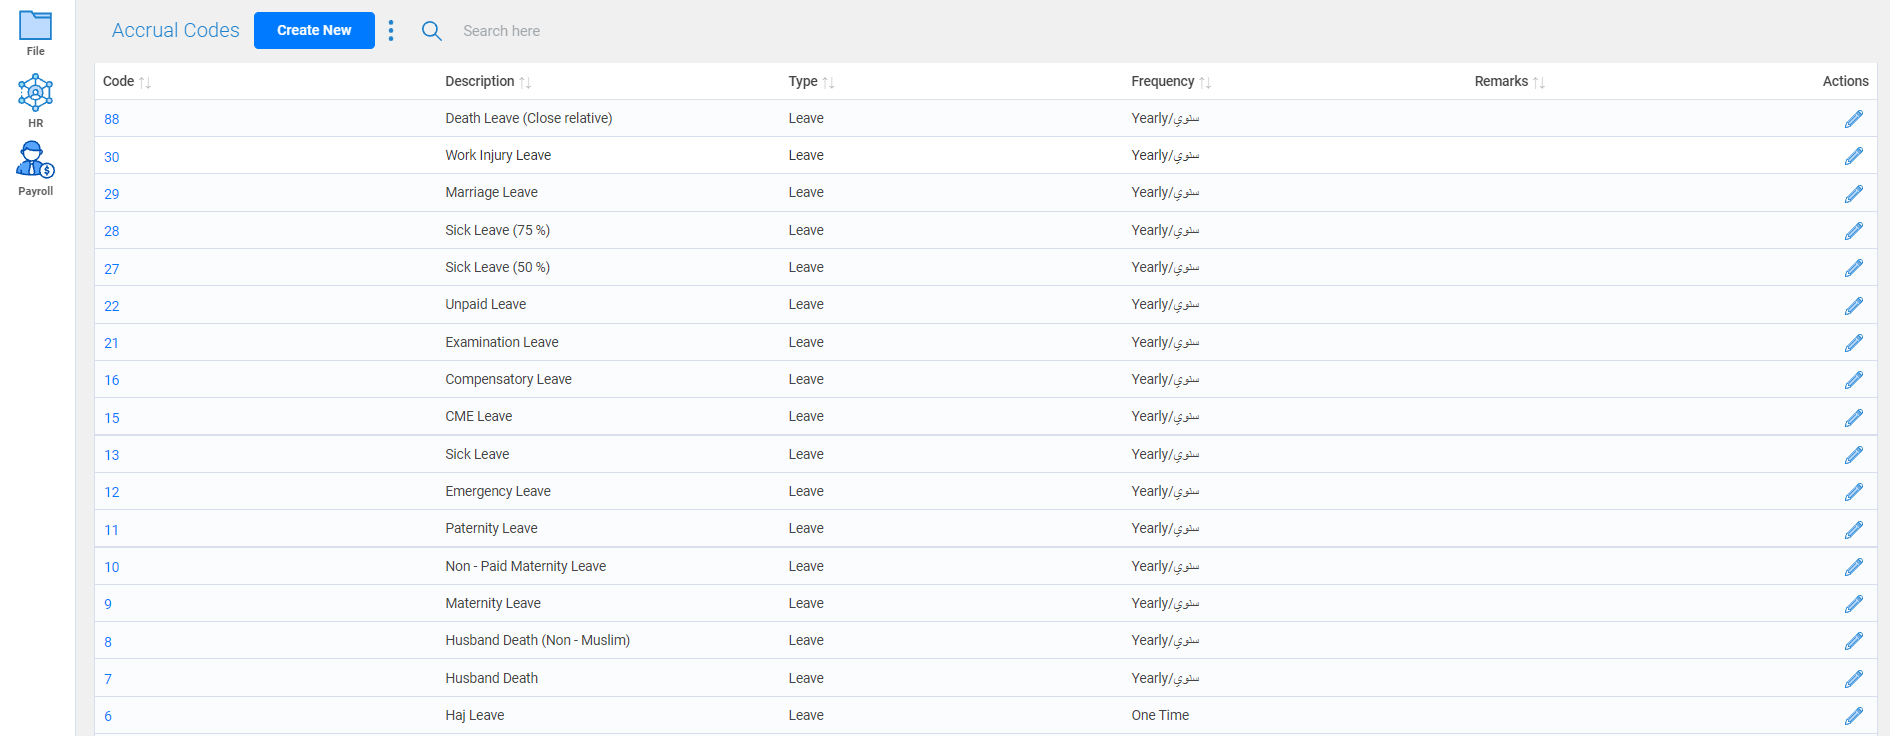
- As default few required accrual codes has been created; you can either view them or edit them if needed.
- You can select the Inactive checkbox to disable the particular accrual code while viewing the accrual codes details.
- To view any details of a particular accrual code, search with its name in the search field.
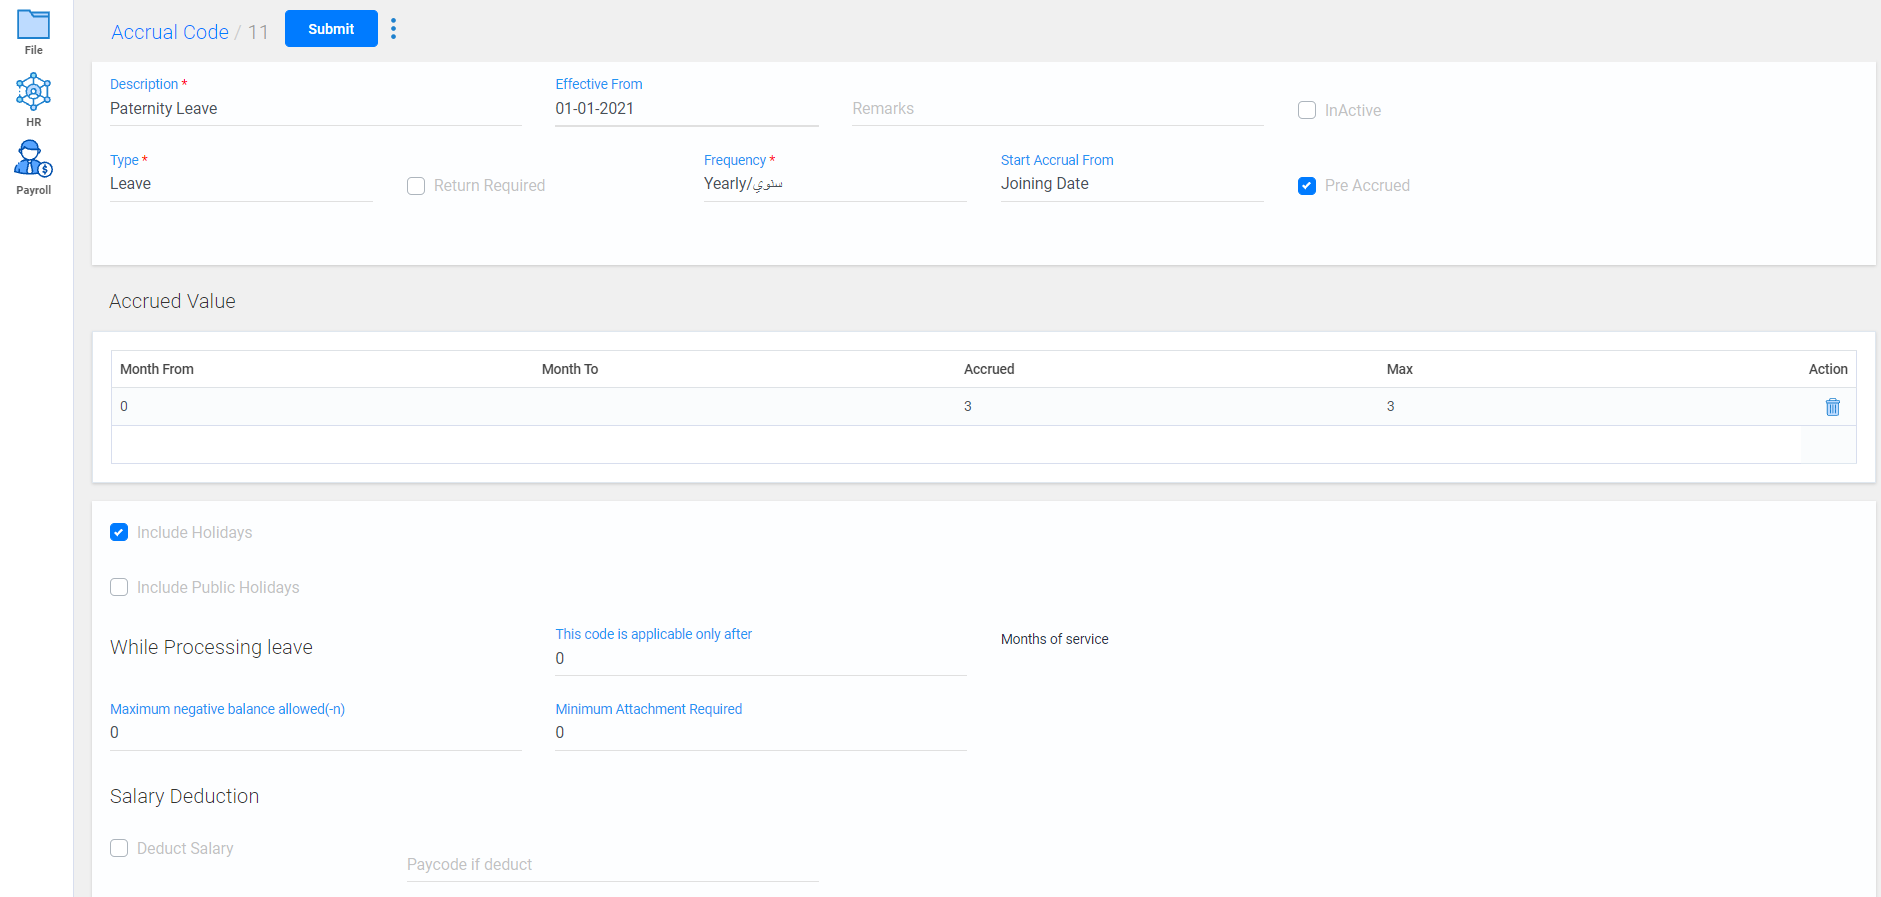
- To create a new accrual code, click on create new button.
- Enter the accrual code name in the description line.
- Current date will be displayed for effective from as default. If it being processed on any further months, enter that specific date.
- Select the relevant type of the accrual code from the list.
- Select the frequency cycle for the accrual to add on.
- Set the start of the accrual either from joining date or calendar start date.
- Select the checkbox pre accured to provide the accrual before the frequency cycle starts.
- In the Accrued Value tab, enter the month from and to, for the accured value to add on based on the frequency cycle till it reaches it maximum value for the mentioned period.
- Select the relevant checkboxes, to include holidays and public holidays to in the accured leave period.
- Set restrictions for the accrual code like negative balance leaves and starting period of the accrual.
- Select deduct salary checkbox, to deduct amount from the selected paycode.
- Click on submit button.
- Watch Video
Payroll Reports
Generates reports based on the salaries and loans provided for the employees of the oragnization.
Go to Payroll -> Payroll reports
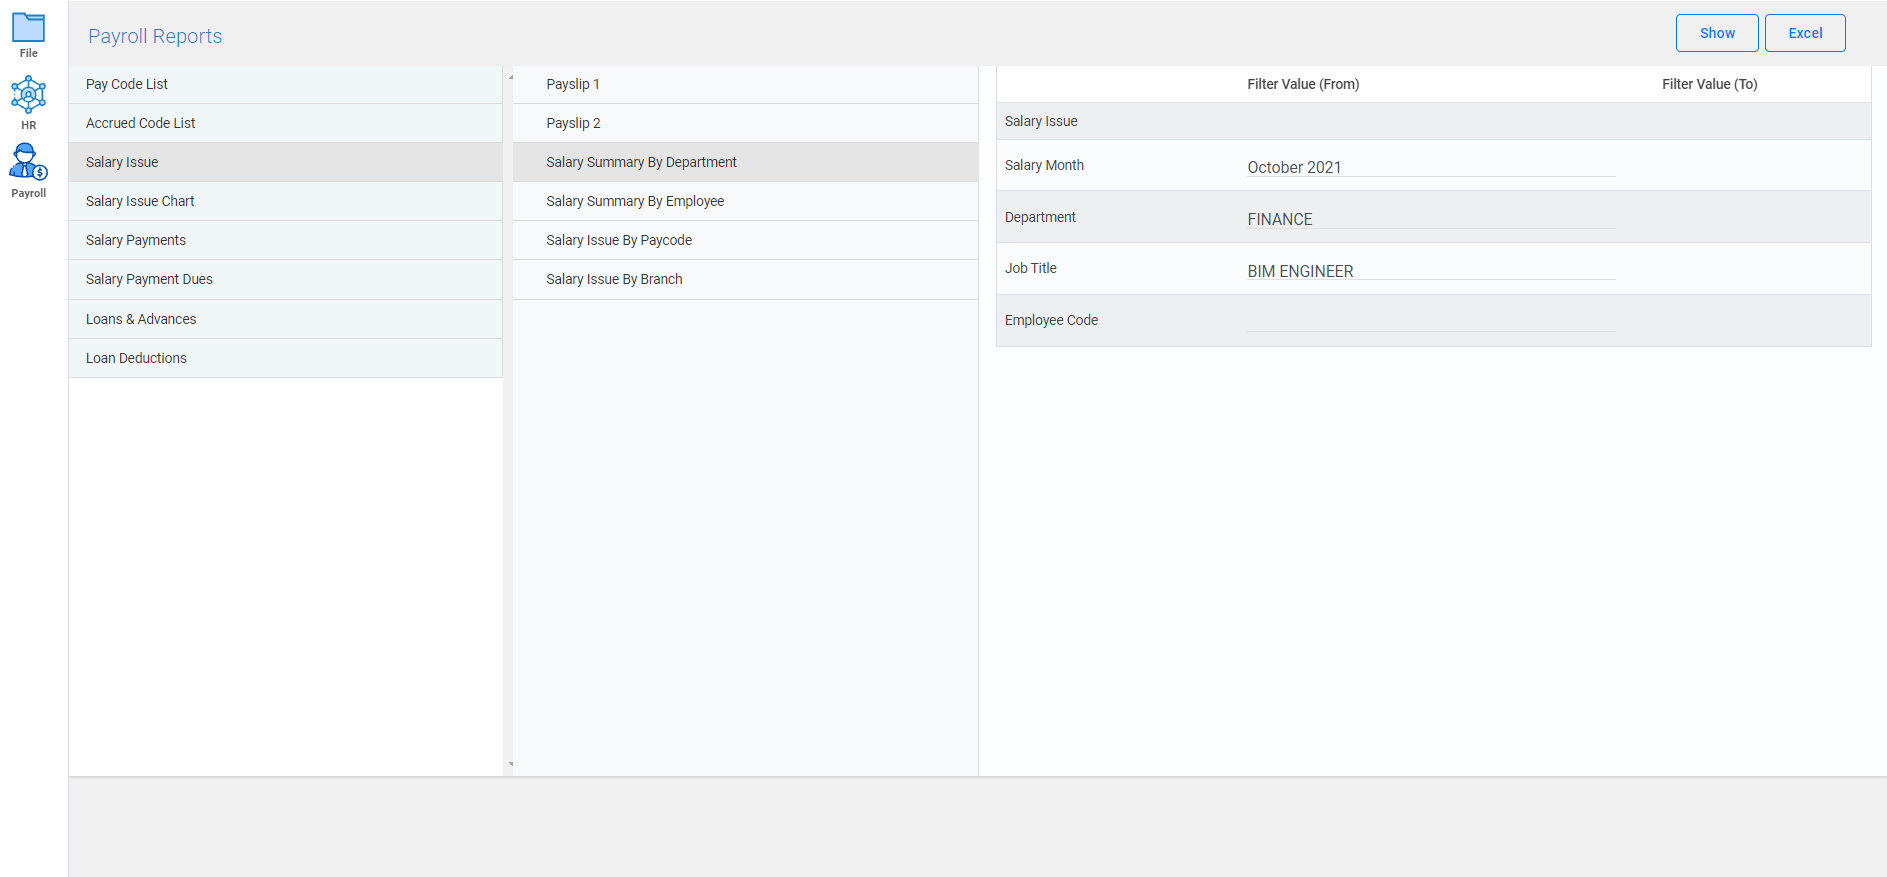
- You can view the detailed payroll reports by filtering from the required fields.